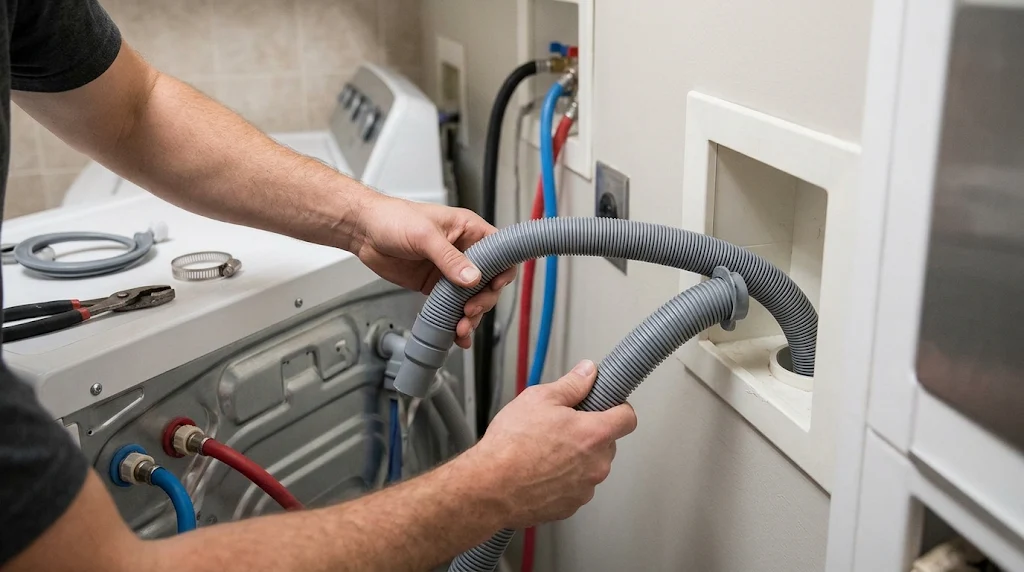
A washing machine can fill with water normally but still create a mess when it starts draining. A loose drain hose, incorrect installation height, or poorly positioned connection can cause water to spill onto the laundry room floor. In some cases, an incorrectly installed hose can also cause the washer to drain continuously.
Installing a washing machine drain hose correctly helps prevent these problems and keeps wastewater flowing into the household drainage system as intended.
The installation process depends on your washing machine model and the type of drainage connection available. Some washers drain into a vertical standpipe, while others use a laundry tub or utility sink.
This guide explains how to prepare the connection, position and secure the hose, avoid common installation mistakes, and test the drainage system before using your washing machine normally.
Why Proper Washing Machine Drain Hose Installation Matters
The drain hose carries wastewater away from the washing machine during draining and spin cycles. If it is incorrectly positioned, several problems can develop.
Common problems include:
- Water leakage: A loose hose may slip out of the standpipe or laundry tub.
- Continuous draining: An incorrect hose height or insertion depth can create a siphoning effect.
- Slow drainage: Kinks, blockages, or restricted connections can prevent wastewater from flowing properly.
- Unpleasant odors: Poor drainage arrangements can contribute to standing water and drainage odors.
- Laundry room flooding: An unsecured hose may move when the drain pump releases wastewater.
These issues can become particularly inconvenient in laundry rooms with wooden flooring, cabinets, or stored cleaning supplies.
A correctly installed hose should remain secure, avoid sharp bends, and follow the washing machine manufacturer’s installation requirements.
What You Need Before Installing a Washing Machine Drain Hose
Prepare the necessary equipment before moving the washing machine or disconnecting an existing hose.
| Equipment | Purpose |
|---|---|
| Compatible washing machine drain hose | Carries wastewater away from the washer |
| U-shaped hose guide | Helps position the hose correctly |
| Approved retaining strap or cable tie | Keeps the hose from slipping |
| Adjustable wrench, if needed | Helps with compatible mechanical fittings |
| Towels | Absorb remaining water |
| Shallow container | Collects water from the disconnected hose |
| Flashlight | Helps inspect the rear connections |
You may not need every item. Many washing machines include a drain hose and the necessary positioning accessories.
Check your owner’s manual before purchasing additional fittings or extension components. Using incompatible accessories can create drainage problems.
Check Your Washing Machine Drainage Setup
Before installing the hose, identify where your washing machine will discharge wastewater.
There are three common arrangements.
Standpipe Connection
A standpipe is a vertical plumbing pipe designed to receive wastewater from a washing machine.
The drain hose enters the open top of the pipe, usually with a curved hose guide that helps maintain its position.
Before installation, check that:
- The standpipe is compatible with your washer’s requirements.
- The hose can enter without being forced too far down.
- The hose remains securely positioned.
- The drainage arrangement maintains the required air gap.
- The plumbing is properly trapped and vented according to applicable requirements.
A standpipe is a common drainage arrangement in residential laundry rooms.
Laundry Tub or Utility Sink
Some washing machines discharge wastewater into a laundry tub or utility sink.
The hose is positioned over the edge using the supplied curved guide or another manufacturer-approved support.
Make sure the hose is secured so that water pressure cannot push it out during the draining cycle.
The sink must also be capable of handling the washing machine’s discharge flow without overflowing.
Dedicated Wall Drain Connection
Some laundry rooms have a dedicated wall drainage connection.
The installation method depends on the design of the outlet and the washing machine.
Do not assume that every wall opening is suitable for direct hose insertion. A proper plumbing connection may require a standpipe, trap, or another approved arrangement.
If the existing connection does not match the manufacturer’s instructions, consult a qualified plumber instead of creating an improvised connection.
Installing a Washing Machine Drain Hose in 7 Steps
Once you have identified the drainage arrangement and checked the installation instructions, you can prepare the hose.
Step 1: Turn Off and Unplug the Washing Machine
Disconnect the washing machine from its electrical outlet before handling the drain hose.
If the machine has recently completed a hot wash, allow the wastewater and accessible components to cool before working.
If you are disconnecting an existing installation, turn off the water supply as well. Keep towels and a shallow container nearby because some water may remain inside the hose.
Never handle electrical connections with wet hands or while standing in water.
Step 2: Locate and Inspect the Drain Hose
Find the drain hose connection at the back of the appliance.
On many washing machines, the drain hose is already attached to the machine. You only need to position its free end correctly.
Inspect the visible hose for:
- Cracks or splits.
- Flattened sections.
- Sharp bends.
- Damaged retaining clips.
- Loose connections.
- Signs of previous leakage.
Replace a damaged hose with a compatible replacement recommended by the manufacturer.
Do not remove factory-installed retaining hardware unless the installation instructions specifically require it.
If you are also working on your washer’s water supply system, read our guide to washing machine valve replacement to understand how the water inlet connection works.
Step 3: Attach the U-Shaped Hose Guide
Many washing machines include a curved plastic support commonly called a drain hose guide or U-shaped hose guide.
Its purpose is to help the hose maintain a suitable bend when placed inside a standpipe or over a laundry tub.
Follow these steps:
- Locate the supplied hose guide.
- Check its orientation in the owner’s manual.
- Feed the hose through the guide.
- Adjust the curve without twisting the hose.
- Check that the guide holds the hose securely.
Some washing machines have built-in hose supports, so an additional guide may not be necessary.
Step 4: Position the Hose at the Correct Height
Hose height is one of the most important parts of the installation.
If the drain outlet is too low, water may flow out of the washing machine through siphoning. If it is too high, the drain pump may struggle to discharge wastewater effectively.
However, there is no single height that applies to every washing machine.
For example, Samsung, Whirlpool, and GE Appliances publish model-specific drainage-height requirements. Some manufacturers also specify different requirements for standpipe and laundry tub installations.
Measure from the floor as instructed in your appliance manual rather than using an arbitrary point on the washing machine.
Always follow the installation manual for your exact model. Do not copy another manufacturer’s measurements because the required height can vary.
Step 5: Insert the Hose Into the Standpipe or Position It Over the Tub
For a standpipe installation, gently insert the hose end into the pipe according to the manufacturer’s specified depth.
Do not push the entire hose into the standpipe.
The required insertion depth varies by model. For example, certain Whirlpool installation instructions specify a maximum insertion depth of 4.5 inches, while some Samsung models have different requirements.
These measurements are model-specific and should not be treated as universal rules.
If you are using a laundry tub, position the hose over the edge with the supplied guide.
Make sure the hose opening remains above the receiving water level and cannot slip into the tub.
Step 6: Secure the Hose and Check for Kinks
A drain hose should not move freely when the washing machine pumps out wastewater.
Use the supplied retaining strap, cable tie, or approved mounting support to keep it in position.
Check the following:
- The hose is not stretched tightly.
- No heavy object is pressing against it.
- There are no sharp bends or twists.
- The hose cannot fall out of the standpipe.
- The connection is not sealed airtight when an air gap is required.
Do not use adhesive tape to seal the drain hose into a standpipe. The required gap between the hose and drainpipe helps prevent siphoning.
If the hose is too short or damaged, obtain a manufacturer-approved replacement or extension solution.
Step 7: Run a Test Cycle and Inspect for Leaks
After completing the installation, inspect the surrounding area before restoring normal use.
Reconnect the appliance according to the owner’s manual and run an appropriate test cycle.
Watch the drain hose while the washing machine pumps out water.
Pay attention to:
- Water escaping around the connection.
- The hose moving or slipping.
- Water collecting around the standpipe.
- Unusual draining sounds.
- Water remaining in the drum.
- Continuous filling and draining.
If everything operates normally and the surrounding floor remains dry, the installation is likely functioning as intended.
If water leaks or the washer does not drain correctly, stop the cycle and investigate before using the appliance again.
Common Mistakes When Installing a Washer Drain Hose
Even a new drain hose can cause problems when installed incorrectly.
Here are some mistakes worth avoiding.
Pushing Too Much Hose Into the Standpipe
Inserting too much hose may interfere with drainage and contribute to siphoning problems.
Follow the manufacturer’s specified insertion depth and use the supplied hose guide.
Installing the Hose Too Low
A drain hose positioned below the required height may allow water to leave the washer continuously.
Check the manufacturer’s installation instructions and adjust the hose position if necessary.
Making an Airtight Connection
A standpipe installation generally requires an appropriate air gap between the hose and pipe.
Sealing the connection with tape or an unsuitable fitting can interfere with the intended drainage arrangement.
Allowing the Hose to Bend Behind the Washer
A washing machine pushed too close to the wall can crush the drain hose.
Leave enough clearance for the hose to maintain its shape when the appliance is moved into position.
Using an Incompatible Hose Extension
An unsuitable extension can restrict drainage or create connection problems.
Check the manufacturer’s approved extension length, connector size, and installation procedure before extending the hose.
If you are unsure about your appliance’s drainage requirements, visit GE Appliances washer support for manufacturer troubleshooting and installation information.
How to Fix Common Washing Machine Drain Hose Problems
Sometimes the washing machine works initially but develops drainage problems after installation.
The following checks can help identify common issues.
| Problem | Possible Cause | What to Check |
|---|---|---|
| Water leaks onto the floor | Loose or displaced hose | Retaining guide and connection |
| Washer fills and drains continuously | Incorrect height or siphoning | Manufacturer’s height and insertion requirements |
| Water drains slowly | Kinked or obstructed hose | Visible hose bends and blockages |
| Hose falls out of standpipe | Inadequate support | Approved retaining strap |
| Unpleasant drainage odors | Plumbing or drainage issue | Standpipe, trap, and drainage arrangement |
| Washer does not drain | Obstruction, pump issue, or hose problem | Manufacturer troubleshooting instructions |
Incorrect hose positioning, excessive insertion, and kinks can contribute to drainage problems.
If the standpipe repeatedly overflows, the household drain may be blocked or undersized. This situation may require professional plumbing assistance.
Do not remove plumbing fittings or dismantle the washing machine pump unless you have the necessary experience and model-specific instructions.
When Should You Call a Professional?
Some drain hose installations are straightforward, but others involve changes to household plumbing.
Consider hiring a qualified professional when:
- There is no suitable standpipe or approved drainage connection.
- The existing standpipe repeatedly overflows.
- Water leaks from inside the wall.
- The drainpipe appears blocked.
- You need to install or relocate plumbing.
- The washing machine continues showing drainage errors after the hose is positioned correctly.
In Florida, persistent water leakage deserves prompt attention because moisture can damage cabinets, flooring, and nearby building materials.
A plumber can assess the drainage connection, while an appliance technician can investigate problems involving the washer’s drain pump or internal components.
Washing Machine Drain Hose Installation Checklist
Before considering the job complete, review these points:
- The drain hose is compatible with the washing machine.
- The hose is free from cracks and visible damage.
- The supplied hose guide is correctly positioned.
- The outlet height follows the model-specific instructions.
- The hose insertion depth is correct.
- The hose is securely supported.
- The hose is not kinked or crushed.
- The required air gap is maintained.
- The receiving drain can handle wastewater flow.
- A test cycle has been completed without visible leaks.
Keeping this checklist near your laundry area can also help when relocating the washing machine or reconnecting it after cleaning.
Frequently Asked Questions
1. How high should a washing machine drain hose be?
The correct height depends on the washing machine manufacturer and model. Some washers require a minimum height around 24–30 inches, while other configurations have different limits. Always check the installation manual.
2. Can I put a washing machine drain hose directly into a standpipe?
Yes, if the standpipe is a suitable plumbing connection and the hose is installed at the specified height and insertion depth. Maintain the required air gap and secure the hose to prevent it from slipping.
3. Should a washing machine drain hose be airtight?
No. For a typical standpipe installation, the hose should not be sealed airtight into the pipe. The required air gap helps prevent siphoning and allows the drainage system to function properly.
4. Why does my washing machine drain while filling?
This can happen when the drain hose is positioned too low or inserted too far into the standpipe. The arrangement may create a siphoning effect. Check the installation height and hose insertion depth against the manufacturer’s instructions.
5. Can I extend a washing machine drain hose?
Some manufacturers allow approved drain hose extensions, but maximum lengths and connection requirements differ. Check your washer’s documentation before purchasing an extension.
6. Can a washing machine drain hose go into a laundry sink?
Yes. Some washing machines are designed to discharge wastewater into a laundry tub or utility sink. Use the supplied hose guide and secure the hose so that it cannot fall out during draining.
7. Why does my washing machine drain hose keep falling out?
The hose may not have the correct curved guide or retaining support. Use the supplied bracket or approved strap to keep it in position, and make sure the hose is not stretched or pulled too tightly.
Conclusion
Installing a washing machine drain hose correctly involves more than simply placing its end inside a pipe. The hose must have the appropriate height, insertion depth, support, and clearance to drain wastewater safely.
Start by identifying your drainage arrangement, follow the manufacturer’s installation instructions, and check every connection before running a test cycle.
Avoid airtight standpipe connections, excessive hose insertion, and sharp bends. If the existing plumbing cannot handle the washer’s discharge or the installation continues to leak, consult a qualified professional.
A properly installed drain hose helps keep your laundry area dry and makes everyday washing more reliable.
1 thought on “Installing a Washing Machine Drain Hose: 7 Easy Steps”